What
Would Michelle Do?
For my
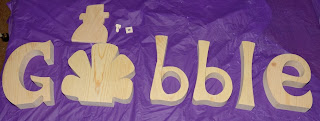
first blog tutorial I did the Gobble letter set and I had a great time making
this project and I am so very happy with the way it turned out!
I love texture and a rustic look. In this tutorial we will cover some easy ways to achieve that look.
I love texture and a rustic look. In this tutorial we will cover some easy ways to achieve that look.
(this photo is a closer look of the finished product)
Here is a
list of the products that I used for this project:
Tools - Sponge brushes
craft sponge
sand paper or sanding block
vinyl applicator
scissors
pencil
Colorbox ink applicator
Products
– Minwax mahogany stain.
Delta paint colors spice brown, trail tan, black,
yellow straw and mendocino red.
Echo Park papers Reflections Fall collection papers
Harvest Plaid (floral side), Fall Dots (dot side), Autumn Stripes (both sides),
Acorn Forest (chevron side).
Doodle Bug glitter in beetle black and orange.
Darice wood glue,
PLAID clear acrylic sealer, and
texture cream.
Colorbox dark
brown ink.
Ribbon, antique wire and doodlebug bling.
Before
staining or painting sand down any rough places on the wood and make sure that
it is dust free.
Using a sponge brush stain the back and sides of all of the letters and the turkey base that is used for the O. Set aside and allow to dry.
Using a sponge brush stain the back and sides of all of the letters and the turkey base that is used for the O. Set aside and allow to dry.
I did not have the shade of paint that I wanted so I mixed two colors to get it. Using two parts Delta trail tan and one part spice brown until the color is even. If it is not the shade that you want adjust it with the appropriate color.
Using a
sponge brush apply the mixed paint to the body and sides of the turkey. If
necessary apply a second coat. Allow to dry. Apply black paint to the hat and
allow to dry. Tip: to get a nice even line use painters tape.
Using a clean sponge brush apply a good coat of wood glue to the hat portion of the turkey body. Cover with black glitter. Remove excess glitter and set aside to dry.
Using a clean sponge brush apply a good coat of wood glue to the hat portion of the turkey body. Cover with black glitter. Remove excess glitter and set aside to dry.
Select the papers that you are going to use for each letter and feather of the turkey. Place the paper face down. Place the letter face down on top of the paper and trace the letter. Cut the letters and feathers out.
Lay out all
of the cut papers on the top of the wood in the order that they will go to make
sure that you like the look and flow.
Wad all
of the papers up into balls to create folds and creases in the paper. Be
careful not to tear the paper too much.
Unfold papers and sand the paper using sand paper or a sanding block. Once all of the paper has been prepared apply a liberal amount of wood glue to the wood and adhere the paper to the wood. Use a vinyl applicator to smooth the paper down. Do not smooth it too much you do not want it to be completely flat. Set aside to dry.
Unfold papers and sand the paper using sand paper or a sanding block. Once all of the paper has been prepared apply a liberal amount of wood glue to the wood and adhere the paper to the wood. Use a vinyl applicator to smooth the paper down. Do not smooth it too much you do not want it to be completely flat. Set aside to dry.
Once the texture cream and glue are
completely dry. Sand all of the edges enough to expose the white core of the
paper and the edge of the wood. You can do this using sand paper, a sanding
block, a dermal or electric sander.
Glue on the beak and add the doodle bug bling for the eyes.
Add any embellishments that you like. I used a glue gun to attach ribbon to the
hat buckle and to the hat of the turkey body. Using wood glue adhere the turkey
body to the feather block. I used antique wire and ribbons to embellish mine. Wrap
the antique wire around the first b and the l in a diagonal spiral. On the G,
second b and the e wrap the wire around the letter and twisted to hold in
place. Leave lengths of wire on both sides. Twist the wire around a pen to
create a coil on both sides. Then add a ribbon bow in coordinating colors above
the wire.
Tutorial By Michelle Harrington


No comments :
Post a Comment