
FA LA LA LETTER SET
Tutorial
Tutorial
Who else is ready for Christmas? Doing this Christmas Fa La La letter set sure got me into the Christmas spirit! There are so many fun and adorable things to make for your home for the holidays at The Wood Station. From letter sets to Door hangs, you can find just about anything in their store. And their paper selection is awesome – I had a hard time choosing which papers to use!
.jpg)
First, start off by prepping your wood. Wipe off any excess saw dust from your project and sand down any rough edges. Make sure you get as much excess saw dust off as you can, so the paint and paper will stick better to the wood.

.jpg&container=blogger&gadget=a&rewriteMime=image%2F*)
Time to pick your paper and trace out your letters. I always mark the front of my letter with a pen or pencil. Even though the [A]’s and the [L]’s are the same letter, they are each hand cut so they all have a little bit of their own character… So I marked each of them with the paper color/design that I traced the letter on, just to make sure I got the correct one. When tracing your letter, lay it face down on the back side of the paper you are going to use. Cut out and set aside.
.jpg)
When painting wood that you are going to be using paper on, only paint the back, sides and the very edges of the front. Paper will sick better to unpainted wood. You can paint/stain the letters all one color, or using coordinating colors to match your paper. Make sure you paint the entire bottom block that the vinyl will go on.
.jpg)
.jpg&container=blogger&gadget=a&rewriteMime=image%2F*)
When gluing paper onto wood, ALWAYS use wood glue! {Purchased at The Wood Station} I have projects from last year and the paper still looks awesome! Before using wood glue, I used Modge Podge and anything I used that on has lifted/bubbled. Use a thin layer of glue spread on the entire letter and put on your paper, making sure to push out any air bubbles getting the paper nice and smooth. Once dry, sand off any excess paper – making sure to sand downward as to not pull the paper back off.


At this point, be creative! If you want to distress it – go for it! The Wood Station has anything and everything you will need to complete your project. Embellishments, ribbon, wire, etc. The fun thing about all of their projects is that they have everything to make them your own.
.jpg)

Happy Crafting!
*Make sure once you finish all those Christmas projects you upload pictures to
The Wood Station Facebook page!
The Wood Station Facebook page!

Tutorial by Taylor Peterson

-------------------------------------------------------
What Would Michelle Do?
 I love it when things coordinate! I like to tie the crafts that I do for each season together so that they all coordinate. I like to use colors, papers, embellishments and techniques to do so. The crafts are all different with their own character but, they all tie together. I am going to show you how I did that with three of the Valentines projects from The Wood Station. This time you are going to get a bonus tutorial! I will be posting tutorials for two projects. A Be Mine banner tutorial and an I love U letter set. Here are the three projects that I tied together.

When making the hugs and the I love U, I used a lot of the same techniques with the distressing of the papers. I decided to make a banner to tie the two together more. For the banner I used all of the same papers that I used in the other two projects. I also used the same techniques and the same embellishments.
First I will show you how I made the I love U.

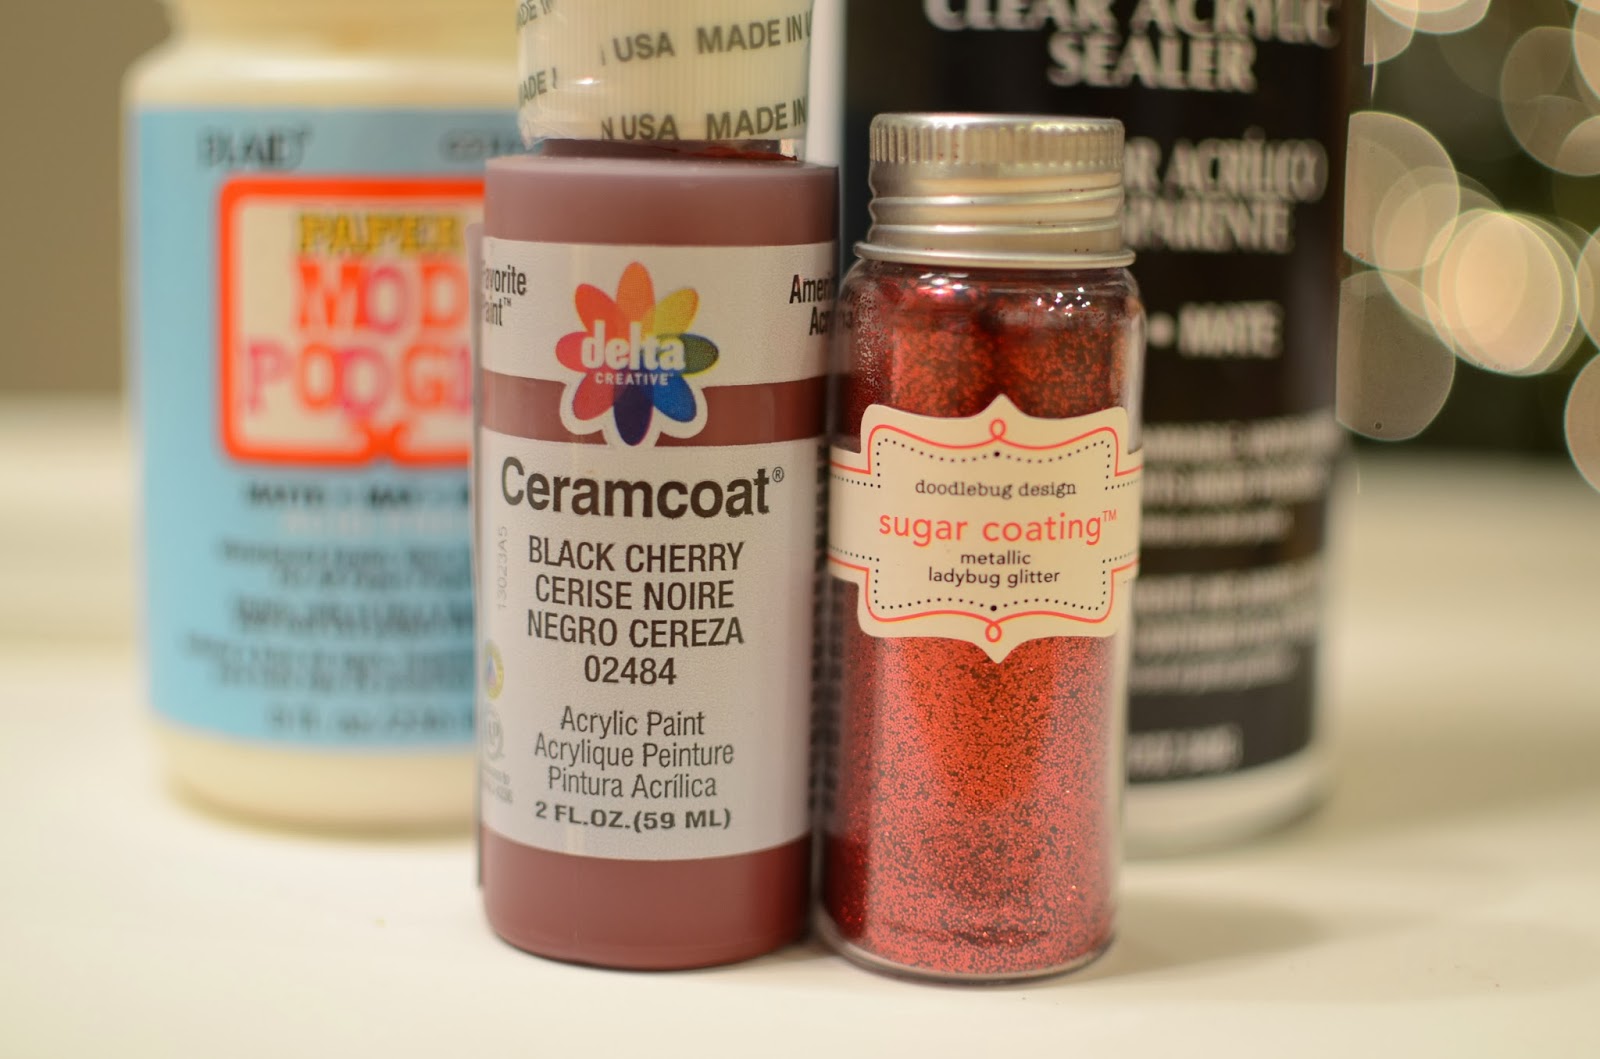
Here is a list of products that I used: Minwax dark mahogany stain, Delta white paint, Doodlebug white glitter, Dorice wood glue, Red wire, small metal key, Colorbox dark brown ink, Papers by My Minds Eye Cupids Arrow NO.14 Cheveron and Confetti Heart, spray sealant, large clear sticky rhinestones and sheer brown stitched ribbon. The tools you will need are: two foam bruhes, sandpaper, Colorbox inking tool, wire cutters, the inside of a pen, and scissors.
Here is a list of products that I used: Minwax dark mahogany stain, Delta white paint, Doodlebug white glitter, Dorice wood glue, Red wire, small metal key, Colorbox dark brown ink, Papers by My Minds Eye Cupids Arrow NO.14 Cheveron and Confetti Heart, spray sealant, large clear sticky rhinestones and sheer brown stitched ribbon. The tools you will need are: two foam bruhes, sandpaper, Colorbox inking tool, wire cutters, the inside of a pen, and scissors.
When you take the wood out of the package it will still have sawdust on it. You will need to prepare the wood by removing the excess dust. I like mine to be very smooth so I sand all of the pieces to remove any rough areas.
I only covered two pieced with paper. The easiest way to cut paper to cover the wood is to pace the piece face down on the back side of the sheet of paper. Use the inside of a pen to trace around the entire piece. Tip: If you take the inside out of a pen it is much easier to trace around the small areas of the piece. Trace all your pieces and set the paper aside. This will make your project more time efficient.
Using a foam brush apply the stain to the back and sides of all the pieces. I stained all of the sides of the center heart. One of the things that I love about stain is that it goes on so quickly. It is much faster than painting.


While the stain is drying cut the paper that was traced before staining.
While the stain is drying cut the paper that was traced before staining.

To create texture and depth you can distress the paper. I did this by wadding and inking the papers. So the next step is to wad the paper up into a ball and unfold it. The more distressed you would like it the more crinkles it will need to have. Play with the paper until it looks the way that you want it.
Then using a colorbox inking tool to apply dark brown ink to the creased parts of the paper. Start out lightly, you can always add more ink but you can’t take it off. Ink until you have the look that you want.


Once the stain is dry apply an even layer wood glue to the front of the wood piece using a foam brush. You do not want the glue to be too thick or too thin or you will have issues. Set the paper covered pieces aside to dry. I always place mine face down to help the paper adhere.


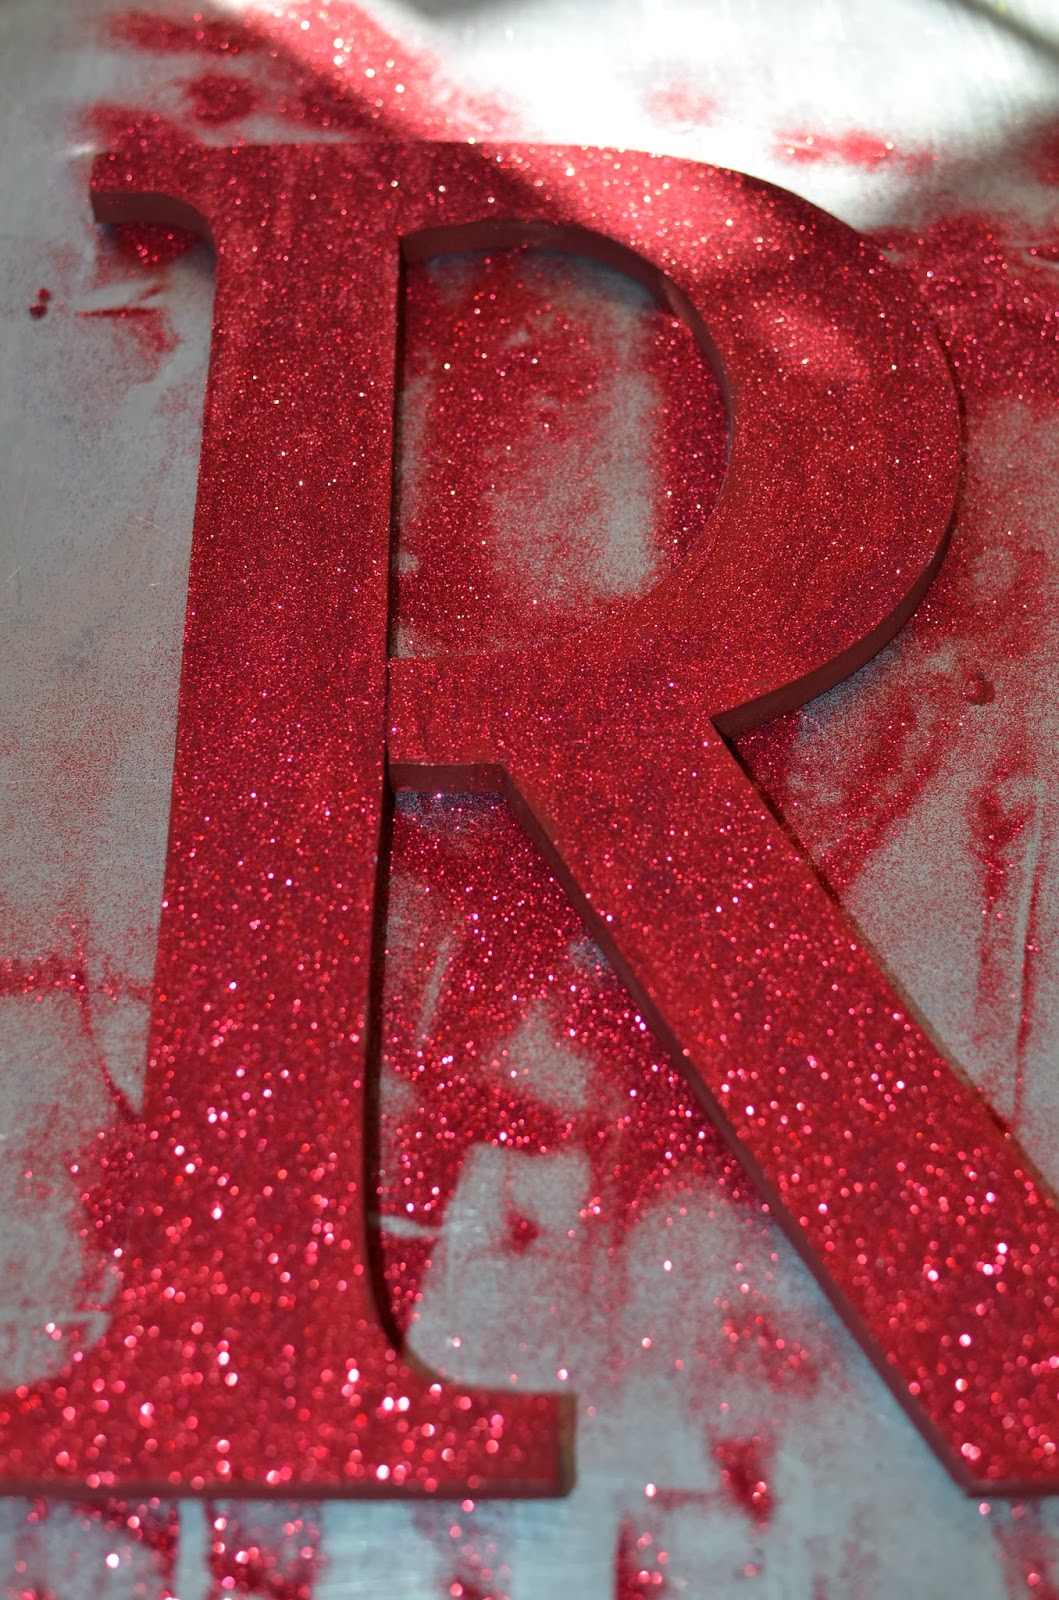
Next apply the glitter to the dot of the I and the outside piece of the heart by applying a good layer of wood glue using a foam brush. Make sure that the layer is even or you will be able to see streaks in the glitter. Place the piece over a sheet
of paper. Cover completely with glitter. Let it set for a minute and then dump the excess glitter onto the paper and return the glitter to the bottle. Repeat with the next piece. Set aside to dry. Then spray the glitter with a sealant. This will keep the glitter from falling off everywhere.
Once all the pieces are dry sand the edges and apply dark brown ink to all of the edges. After that apply the embellishments.


Cut a piece of red wire the size that you would like it, make sure that you leave plenty of length to curl it the way that you want it. Press the center of the wire around the back of the I in the location that you would like it. Twist it one or two times in the front to hold it in place where you want it. Place the small metal key on the wire and twist once or twice to hold the key in place. Then using the wood end of a foam bush or a pencil curl the ends of the wire around it as many times as you like. Then bend or stretch the wire to get your desired look. Place the dot into the top of the I.
Place three medium size rhinestones off of a large set of rhinestones onto the lower right side of the U. Place the center of the heart into the outside piece that you glittered. Tie the sheer brown stitched ribbon into a bow around the left side of the heart. Then it is finished!


What Would Michelle Do? - Be Mine
The second tutorial is the project that I did to tie the other two together.
Be Mine banner.

This turned out to be a really fun project for me. It was like starting with a blank canvas. There is something gratifying in releasing your mind and creating something. A special thanks to Nancee for the idea of using the hearts on the ends. My goal was to tie together the two Valentine projects that I had already done. So I decided to use all six of the papers that I had already used and add a paper. I used the four papers from hugs and the two papers from I love U. I also used some of the same techniques and embellishments from each of the previous projects.
Here is a list of products that I used: two slat board hearts, 3 top note banner pieces, 3 pendant banner pieces, Minwax mahogany stain, Delta black cherry paint,
Darice wood glue, texture cream, spray sealant, red wire, Doodlebug red glitter, Doodlebug white glitter, Colorbox dark brown ink, 5 small metal keys, small black striped ribbon, black sheer stitched ribbon, white sheer stitched ribbon, black stitched ribbon, black polka dot ribbon, black sprinkles, small rhinestones from the larger set of rhinestones, small wood heart, Papers by My Minds Eye Cupids Arrow NO.14 Cheveron and Confetti Heart, Lost and Found Record It! Heirloom Adores, Papers by echo park Head Over Heels Just Love You, Papers by Fancy Pants Designs BE.LOVED. Old Flame, BE.LOVED. Love Letter, BE.LOVED. Adoration. Tools I used: 2 foam brush, scissors, sand paper, wire cutters, Colorbox inking tool, a drill with a small bit.

Label the front of all of the wood pieces as the front and which letter it is. All of the pieces are slightly different; therefore you will have to match each piece to the paper that you traced it on. You will also need to trace each individual piece. Trace all of your papers and set them aside.

Make sure that the wood is free of saw dust. Use a foam brush to apply the stain to the sides and back of all banner pieces. This will go very quickly. Set aside to dry. Paint the small wood heart with the black cherry paint and set aside to dry.


Cut out the shapes the traced shapes while the stain dries.

To add texture and depth wad up all of the papers and unwed them until you have the amount of crinkles that you like. Be careful when wadding papers with glitter. Take your time and only the parts of paper that do not have glitter on them. Spray the glittered areas with a sealant. This will help the glitter stay in place. Sand the papers using a piece of sand paper to achieve the desired look.

Apply an even layer of glue to the wood piece then adhere the paper that was cut out for that piece. Set the piece aside face down to dry. Repeat this process until all of the paper has been glued on. When the pieces have dried sand all of the edges. Use a Colorbox ink applicator to apply ink to the papers on all of the edges and the crinkled and sanded areas. Start out light on the ink, you can apply more but you cannot remove it. Ink until you achieve the desired look.


Using a sponge apply texture cream to each piece. While the texture cream is still wet using your fingers lightly pinch and sprinkle with white glitter. Pus n even layer of wood glue on the small wood heart and cover it with red glitter. Set aside to dry. When dry spray with sealant.

Drill two holes in each of the hearts; one on each side to attach the pieces and hang the banner. Turn the banner pieced and poke a sharp object thru the holes to pierce thru the paper. Cut nine pieces of red wire 13 inches long using wire cutters. Curl one end of each wire around the wooden end of a small foam brush three times. If you curl it more times than that there will not be enough room between your pieces for the embellishments. Place the wire thru one end of a banner piece then the adjoining end of the next banner piece. Curl the strait end of the wire around the end of the foam brush tree times. This will hold them in place. You can bend or stretch the wire to achieve the look you want. For the two ends thread the strait
end of the wire through the hole. Bend the end of the wire over and twist the wire together to form a loop to hang the banner from.
Adhere the vinyl to the banner pieces. I put texture cream over the top of mine to help them stay in place.

Cut ribbon to desired length. Tie the five small metal keys to the ribbon and tie all of the ribbons to the wire.


Embellish as desired. I glued the small wood heart to the I banner piece. I used black sprinkles and rhinestones to add interest.
Tutorial By Michelle Harrington

-------------------------------------------------------------------------
Do you love to have a fresh wreath hanging in your house or on your door?
They are beautiful.
They smell so good.
The are Inexpensive.
How about we spruce it up a bit.
This year we wanted to share something a little more fun.
This Blog post is from our friend over at http://someoneinmind.blogspot.com/
Erin is a long-time blogger who loves writing about her family, faith, and home.

You should know that I'm not super crafty.
So this is an easy DIY project.
I love The Wood Station
and knew I could find everything I needed there.
Now, that is my kind of Crafting!!!

My List of Supplies was the following:
- Costco Wreath $15.00
- Wood Initial from The Wood Station $7.55
- Glitter from The Wood Station $4.55 (This is one of those items that will last and last!)
- Paint (Already had this on hand or can be purchased at The Wood Station)
- Mod Podge (Already had this on hand or can be purchased at The Wood Station )
- Rustic Bells 2-pack from The Wood Station $1.45
- Ribbon (Odds and Ends I already had but probably about $2.00 or can be purchased at The Wood Station)
- Clear acrylic Sealer (Already had this on hand or can be purchased at The Wood Station )
- Bailing Wire (I love this stuff. I purchased 500 feet for 4.95 at Cal Ranch and it has lasted for years.
- A small screw.


I used my favorite crafty minion (Kate, see below) to paint for me. Ikea kids bowls and a big cookie sheet are the perfect support for minimizing the painting mess. Apply one or two coats of paint on each side and make sure to be careful to smooth any thick edges. I didn't even sand my Letter. It came in a great, smooth condition.

Once the paint was dried we applied Mod Podge to the entire Letter. We did this super fast and I would recommend slowing down a little and taking your time. I only applied it to the top Letter and not to the sides.

You will want to glitter your Letter as soon as the Mod Podge is on because it will dry fast. You can apply the Mod Podge in sections if it is easier because I did miss some spots and you can tell where the glitter isn't as thick.
I poured the entire bottle of glitter on the letter and then wiggled and moved it around. This helps it disperse evenly. I then picked up my letter and shook the remaining glitter and dumped it onto a large piece of paper. It is easy to then bend the paper and put the glitter right back into the bottle. I only used 1/5 of my bottle of glitter doing this large letter. It goes a long way!
Let your letter dry for 20 minutes or so.
You can start making your bow while it dries.
There are many ways to make a bow and I did mine like this.


After I tied my bow, I attached the bells using some decorative wire, but you can use any kind and I love bailing wire, which is cheap!
I sprayed my Rustic Bells with Sealer first so that the rust wouldn't get all over everywhere. It also darkened the color a bit.

Then I cut up my ribbon into about 7 inch pieces and layered them across the bow.
I then used two pieces of ribbon to tie around the whole bow to keep them together.

I used a wire to attach the bow to the Letter.

I wanted my Initial to hang slanted a little on my wreath.
I put a screw in the base of the letter so that I could use a wire and tie it to the wreath to help it stay slanted. Oh ya, almost done.
Make sure to use your Sealer spray to spray your entire Initial. It gives it a finished look and also helps the glitter to stay in place and not end up on your entry way.

Then I used a burlap ribbon to attach the Letter. This worked great for me because I used an R and a P and both of these allowed me to just tie the bow around the top. You might have to get a little more creative with an W or an X! Maybe use the screw method which I used for my slant.

Now wasn't that easy.
Simple and Easy.
And guess what. I can just take my initial off after Christmas and store it until I buy my next Costco Christmas wreath!
Let me know if you end up making a wreath.
I'd love to see your pictures too!
Email them to someoneinmindblog@gmail.com

Merry Christmas!!!!!!
Tutorial By Erin Peterson

------------------------------------------------------------------
What would Michelle do?
Noel Letter Set Tutorial
I love Christmas! I have so many Christmas decorations that I could probably open my own store. But, when it comes to colors and Christmas I am definitely not a traditionalist! I am not into the old school green and red, which is great if that is what you like. All of my Christmas decorations are navy blue and silver with a little burgundy thrown in. I am a firm believer that when crafting or decorating you should use the colors that you love and by doing so you will love all the projects you make. Today I am going to teach you a fun technique that is a little more advanced but super easy to do. I am also going to use non-traditional colors on this Christmas project.

Here is a list of the items that I used on this project:
Noel letter set, mahogany stain, midnight blue delta paint, Papers from echo park Keeping Cozy collection: Snowy days (front on the L) and Winter swirls (front on the O and back on the E), navy blue crinkle satin ribbon, medium rustic bell, sponge brushes, Dorice brand wood glue, dark brown ink, colorbox ink applicator, sand paper and Vaseline. All items except the stain and Vaseline can be purchased at The Wood Station.
When starting any wood project I like to sand off any rough spots. Make sure that the wood is dusted free of sawdust. Using a sponge brush stain all sides of the N, also the bake, sides and front edges of the o, e, and l. Let the stain dry completely.


Once the stain is dry apply Vaseline to any location that you do not want the paint to stick and the stain to show through. I applied it to random places on the edges and on the solid parts of the letters as well. Using a clean sponge brush apply a coat of paint. Paint right over the top of the Vaseline. Apply a second coat if needed.


You can see where the Vaseline was applied under the paint. Allow the paint to dry for several hours or overnight. Once the paint is dry use a napkin, paper towel or rag to wipe the paint off of the places where the Vaseline was applied,


The paint will rub right off in those places making it look as though the paint peeled off due to age or weather. You can also do this with two shades of paint if you like. You can also sand it in places to give it an even more rustic look.


A little tip: If you have letters that are a tight fit for tracing, take a pen apart and use just the ink barrel portion as shown above.


Happy Crafting!
.............................................
Distressed Shelf Tutorial
I am really into the look of distressed furniture, frames, shelves… anything pretty much! I did this shelf from The Wood Station up and tried a new distressing technique.
I loved how it turned out!

Supplies:
Shelf from the Wood Station – you could use this technique on anything
Paint – Any Color (I planned on painting other items the same color so I chose a pretty ivory color which I got from Lowes)
Sand Paper
Paint Brush, Foam Roller, Foam Brush (this depends on the texture you want)
Stain
Valspar’s “Clear Mixing Glaze” – Lowes
I started by staining my entire shelf. I used a couple of coats so it was nice and dark.
After letting dry overnight (so it wasn’t sticky at all) I painted with two (2) coats of the ivory paint.


Again, I let that dry overnight so that I wouldn’t have any problems when I went to sand.
Get Creative!! Sand any edges and corners you want to get that vintage/distressed look! Keep in mind that you only want to sand off the paint and not the stain underneath.
Next, I mixed 2 parts glaze to 1 part stain (You can use however much or little stain you would like depending on what color you are shooting for.)

I painted the glaze mix evenly onto the entire shelf, focusing on the bead-board where I had sanded quite a bit – it was a little too dark for my liking so I used a wet paper towel and lightly wiped some of the glaze mix off.
Let dry and enjoy your shelf!
**You can also mix paint with the glaze. For example – You could paint your item a deep red and use a black (paint) glaze using the same technique to achieve the same look.
Tutorial by Taylor Peterson
Seasonal Slat Sign
Halloween, Thanksgiving and Christmas!
That is right...same sign to decorate for three different holidays!


Supplies needed:
Slat Sign
Turkey Cut Out
Reindeer Cut Out
Delta Paint – Light Ivory, Burnt Umber & Barn Red (These are the colors I used. All could be replaced to match any home décor or theme)
Paper
Chevron Vinyl
Foam Brushes
Wood Glue
Ribbon
Velcro
Texturizing Cream
Finish Spray
Pen
Sandpaper
Lets get started.
Paint Slat sign the color you want your Chevron stripes to be. I used Light Ivory. Make sure to get this color into the gaps. Set aside and let dry.

Trace the turkey on the paper. Trace on the side of the paper that will not be shown. Cut our turkey silhouette and set aside. Paint the sides and back of the turkey your desired color. I used the light ivory. Set aside and allow time to dry.
Don’t paint where you are going to be gluing on the paper. The paper will stick better if it is directly on the wood. Once the turkey is dry take the wood glue and spread it evenly on the turkey and apply the paper. Allow time to dry and sand off any paper that hangs over the edge of the wood.


If you want to you can tie a little ribbon around the turkey.

After the slat sign has had time to dry now apply the Chevron Vinyl.
(You don't have to use the chevron vinyl. You could also just paint the slat sign a solid color or choose two colors and alternate them on the slats)
Once the vinyl is on, paint the slat sign again and make sure you paint the sides of the sign as well. Don’t paint between the slats. I used Burnt Umber.

When the second coat of paint is on, and, dry remove the vinyl. You may have some touch up to do but shouldn’t be much. I touched mine up so that the lines were nice and crisp.


Now take your Velcro and place a piece or two to the center of the slat sign and the turkey. Now you can stick your turkey to the slat sign.


So the great thing about this Slat Sign and attaching the turkey with Velcro is that now you can change it for each season.

I created my reindeer right along with my turkey.
Paint the reindeer. Paint the front, back and sides. I used Barn Red.

Once the paint has dried now apply wood glue and spread it evenly on the reindeer. Grab your glitter and sprinkle it all over your reindeer.
Now pick up your reindeer and tap off extra glitter and funnel the extra glitter back into its jar.


Now take the finishing spray and apply it to the reindeer to help seal and keep the glitter on. Once it has had time to dry apply the Velcro to the back and now it is ready to be put on your slat sign after Thanksgiving is over.


There is also a Pumpkin Cut Out that you can make to use during the Halloween season as well.

I really loved how this turned out and love that I can change it for each different season.
This project was fairly easy and didn't take long from start to finish!
Tutorial by Brooke Ward

What Would Michelle Do?
For my first blog tutorial I did the Gobble letter set and I had a great time making this project and I am so very happy with the way it turned out!
I love texture and a rustic look. In this tutorial we will cover some easy ways to achieve that look.


I love texture and a rustic look. In this tutorial we will cover some easy ways to achieve that look.


(this photo is a closer look of the finished product)
Here is a list of the products that I used for this project:
Tools - Sponge brushes
craft sponge
sand paper or sanding block
vinyl applicator
scissors
pencil
Colorbox ink applicator
Products – Minwax mahogany stain.
Delta paint colors spice brown, trail tan, black, yellow straw and mendocino red.
Echo Park papers Reflections Fall collection papers Harvest Plaid (floral side), Fall Dots (dot side), Autumn Stripes (both sides), Acorn Forest (chevron side).
Doodle Bug glitter in beetle black and orange.
Darice wood glue,
PLAID clear acrylic sealer, and
texture cream.
Colorbox dark brown ink.
Ribbon, antique wire and doodlebug bling.
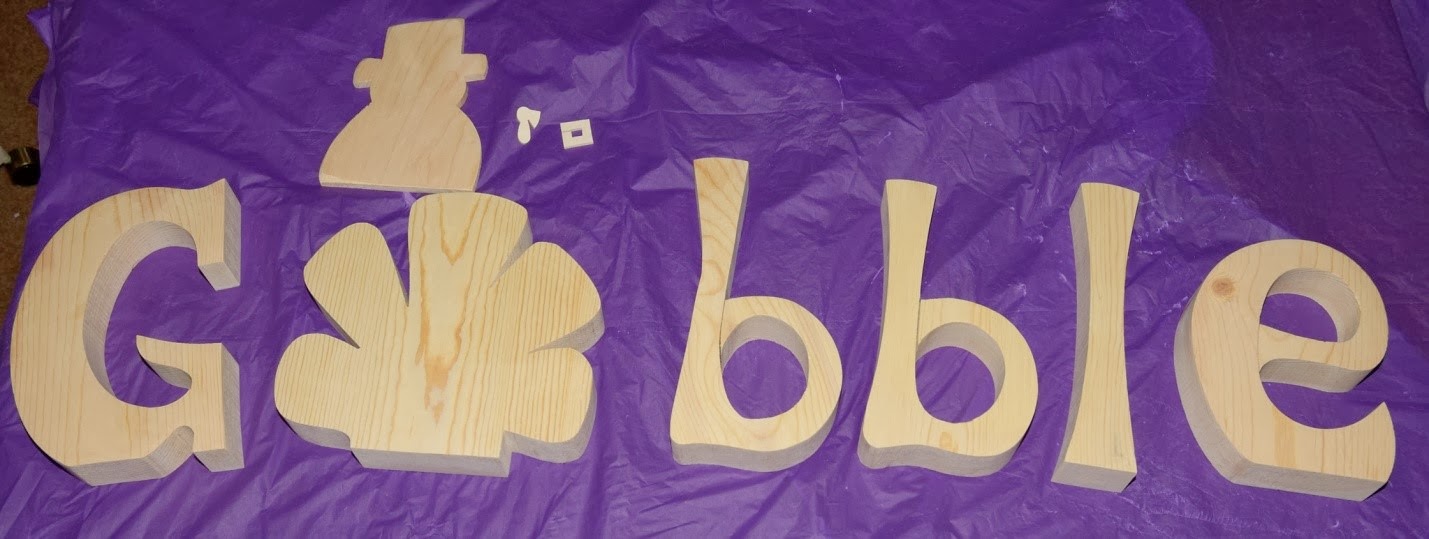
Before staining or painting sand down any rough places on the wood and make sure that it is dust free.

Using a sponge brush stain the back and sides of all of the letters and the turkey base that is used for the O. Set aside and allow to dry.

Using a sponge brush stain the back and sides of all of the letters and the turkey base that is used for the O. Set aside and allow to dry.

I did not have the shade of paint that I wanted so I mixed two colors to get it. Using two parts Delta trail tan and one part spice brown until the color is even. If it is not the shade that you want adjust it with the appropriate color.

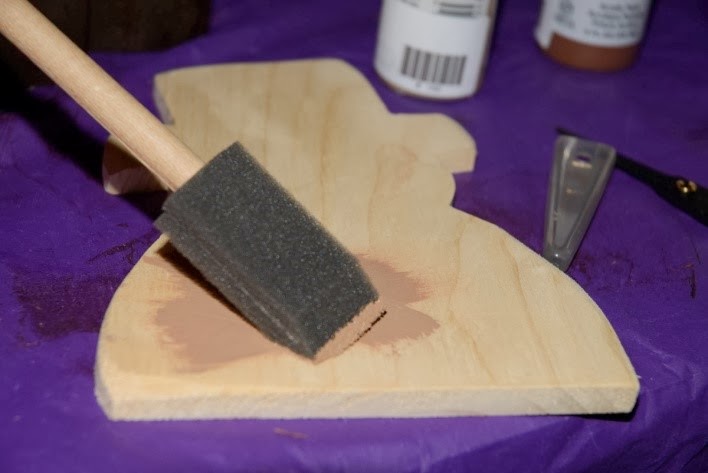
Using a sponge brush apply the mixed paint to the body and sides of the turkey. If necessary apply a second coat. Allow to dry. Apply black paint to the hat and allow to dry. Tip: to get a nice even line use painters tape.

Using a clean sponge brush apply a good coat of wood glue to the hat portion of the turkey body. Cover with black glitter. Remove excess glitter and set aside to dry.

Using a clean sponge brush apply a good coat of wood glue to the hat portion of the turkey body. Cover with black glitter. Remove excess glitter and set aside to dry.

Select the papers that you are going to use for each letter and feather of the turkey. Place the paper face down. Place the letter face down on top of the paper and trace the letter. Cut the letters and feathers out.

Lay out all of the cut papers on the top of the wood in the order that they will go to make sure that you like the look and flow.


Wad all of the papers up into balls to create folds and creases in the paper. Be careful not to tear the paper too much.

Unfold papers and sand the paper using sand paper or a sanding block. Once all of the paper has been prepared apply a liberal amount of wood glue to the wood and adhere the paper to the wood. Use a vinyl applicator to smooth the paper down. Do not smooth it too much you do not want it to be completely flat. Set aside to dry.

Unfold papers and sand the paper using sand paper or a sanding block. Once all of the paper has been prepared apply a liberal amount of wood glue to the wood and adhere the paper to the wood. Use a vinyl applicator to smooth the paper down. Do not smooth it too much you do not want it to be completely flat. Set aside to dry.


.jpg)
.jpg)
Once the texture cream and glue are completely dry. Sand all of the edges enough to expose the white core of the paper and the edge of the wood. You can do this using sand paper, a sanding block, a dermal or electric sander.


Glue on the beak and add the doodle bug bling for the eyes. Add any embellishments that you like. I used a glue gun to attach ribbon to the hat buckle and to the hat of the turkey body. Using wood glue adhere the turkey body to the feather block. I used antique wire and ribbons to embellish mine. Wrap the antique wire around the first b and the l in a diagonal spiral. On the G, second b and the e wrap the wire around the letter and twisted to hold in place. Leave lengths of wire on both sides. Twist the wire around a pen to create a coil on both sides. Then add a ribbon bow in coordinating colors above the wire.
......................................................................................................
Picture Frame Tutorial
September 23, 2013
This tutorial is for the beginners out there that are wanting
to know the basics. These frames are very simple and look great when you are done! The best thing about them is that you can finish them to fit any home or office décor!

Supplies needed:
Unfinished frame from The Wood Station
Paint
Scrap Paper
Foam Brush
Wood Glue
Pen
Scissors
Texturizing Cream
Sponge
Sand Paper

Step 1 - Pick your paper
Pick which side of the paper you are going to be using. Trace around the frame on the side that will not be showing. Make sure you trace the center piece as well


Step 3 - Paint your Frame
Paint the sides, inside, and the back of the frame with your choice of color.
Whenever you are going to put paper on any project you never paint where you are planning on putting the paper. The paper sticks better to the unfinished wood.


Step 4 - Glue on Paper
Wood Glue works the best with scrap paper.
Once the paper is on place it aside and let dry for about 10 - 15 minutes before moving on the next step.

After the glue has dried it is now time to use sand paper to get rid of the excess paper along the edges of your frame. Run the sand paper along the edges until you see the paper falling off.
Once you have removed all the paper along the edge and inside the fame you can continue to sand the edges to give it a distressed look.
Step 6 - Texturize and Sealing
Take a sponge or foam brush and apply the texturizing cream. A very light coat is all that you need. The Texturizing Cream gives your paper a canvas feel and seals it.
This last step is optional. I use the Texturizing Cream from The Wood Station to finish all my frames.

I hope this tutorial helps!
Enjoy your finished project!
Tutorial by Brooke Ward
..............................................
Monster Trio Tutorial
August 29th, 2013

How cute is this Monster Trio set? I had a blast making these! The possibilities are endless when it comes to these. You could do them in ANY color or paper and make them look awesome! These monsters come on a base and dowel with the face kit.
1. Pick your paper – The wood station has so many choices when it comes to paper, it was hard for me to pick out just 3 that I wanted to use. I wanted to go with something bright and fun.
2. Pick your paint – With so many different shades of every color, this makes it very easy to match your paper.

3. Paint the base and dowel whatever color you would like. (I chose black as it would kind of tie everything together and matched all of my paper.)

4. Trace each of your monster’s heads onto the paper of your choice. Choose which side you would like to be the front of the face and put that face down on the back side of your paper. I always get mixed up, so I like to mark the front side with a small “F” in the middle of my piece.

5. Cut out faces and set aside. These monster’s are a little bit of a pain since they have so many curves and tricky spots to be cut out, but it is so worth it!!

6. Paint the back and sides of your monster’s heads going slightly onto the edge of the front.

7. One the paint is dry, using the Wood Stations wood glue, glue the paper on the monster’s head. Set aside.


8. Paint the pieces for the monster’s faces and let dry. Glue them together and put them on the monster heads.

9. Cut strips of paper to glue to the bottom of the dowel. Glue and sand the edges.

10. Sand the edges of the heads.

11. Glue the hair onto the top of the monster’s heads. I found the easiest way to do this was using the E-6000 glue. It dries faster than the wood glue.
12. Glue the dowel to the head, unless you want to be able to turn them.
13. Tie your ribbons on and enjoy your cute little monsters!!

All of the products and supplies used in this tutorial are available at
The Wood Station!
Tutorial by Taylor Peterson
.....................................................................................................................
Tutorial - American Flag Door Hanger
June 28, 2013

Supplies: Flag Door Hanger kit, wood glue, foam brush, scrapbook paper, ribbon and vinyl applicator
Paint: Light Ivory, Midnight Blue, Tompte Red

Paint back, sides and top, middle and bottom stripes red. Set aside to let dry.

Next, take the star and square and paint with midnight blue. You will not need to paint the entire front or back of the square. You will be covering this with paper and the paper will stick better to the bare wood, rather than paint. Only paint around the edges of the wood.

Trace and cut the paper to fit the square. Place a small amount of wood glue on the wood and brush into a thin layer across the entire piece of wood. Line paper up and smooth out, getting all bubble and creases with a vinyl applicator. Once the glue is dry, you can sand the edges of this piece.

Once dry, paint the remaining stripes light ivory. You may need a couple of coats to cover up any red you may have gotten on them.
Tie ribbon of choice onto the star and glue to the papered side of the square. (I used a glue gun to make sure it was secure.)

Apply hardware and glue square with star onto the flag. This can be used as a door hanger, hung on a wall or hung on a post which are also sold at The Wood Station.
All of the products and supplies used in this tutorial are available at The Wood Station!
Tutorial by Taylor Peterson

Nice Blog,And Good use of wood.Thanks for Sharing.Foam Sponge Suppliers
ReplyDelete